
Updos hairstyles for long hair are evergreen hairstyles that fit every occasion from weddings to proms, dates, and even casual outings. So, whether you are a lover of sophisticated braided bun hairstyles, quick casual updos, or intricate knots, there are multiple choices to choose from. There is no doubt that long hair requires patience and a little bit of skill to style, however, they are not as difficult as you may think. With these amazing updo hairstyles for long hair and tips on how to go about them (especially if you are a beginner), you can quickly pull off something formal or chic in a matter of minutes.
Easy Updo Hairstyles For Long Hair
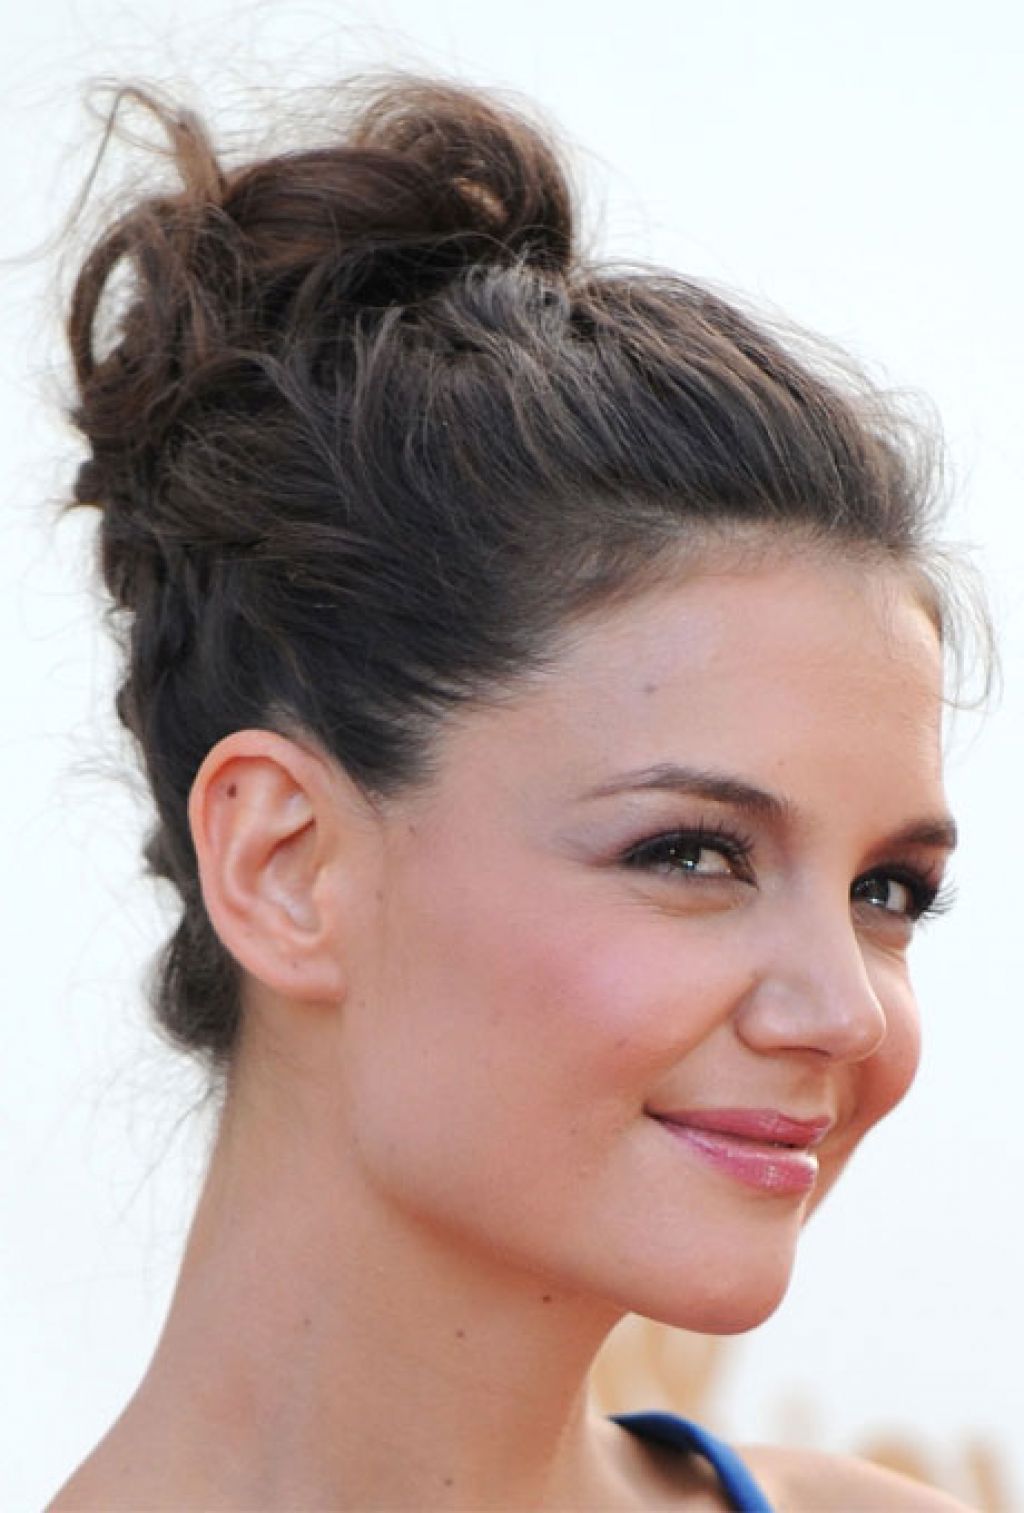
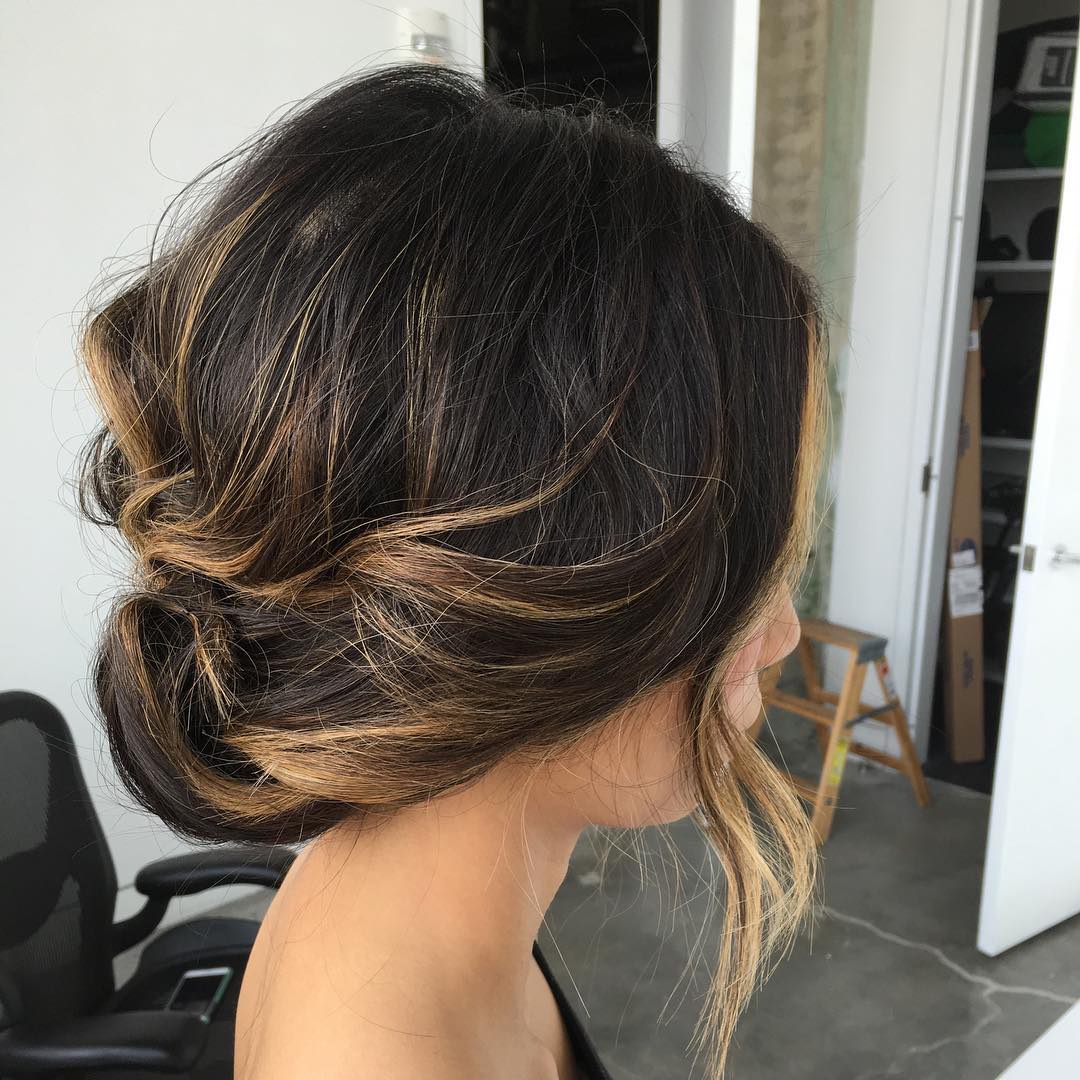
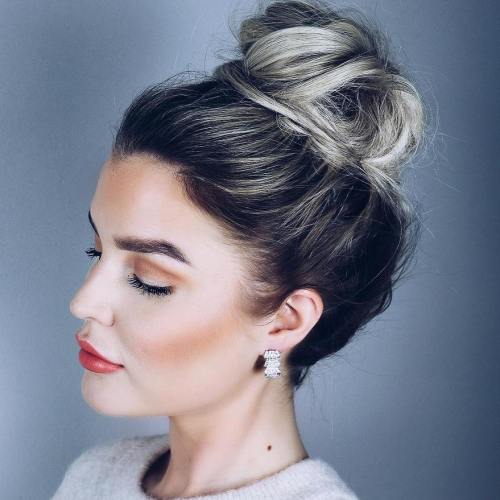
1. Messy Bun Updo
Who doesn’t love a messy bun every once in a while? Asides from being a rather quick and stylish solution if you don’t have all the time in the world to get your hair fixed, a messy bun updo is equally a way to tame your tresses. This style is chicky enough for a dinner date, as well as casual enough for a yoga class.
The whole idea is to leave the hair loose and tousled to create a kind of textured finish with a few tendrils hanging down the sides of the face, giving the edges that dramatic look.
Get Your Messy Updo Done In These 3 Simple Steps
Here are 3 simple steps to get your messy updo done. These steps are suitable for medium-to-shoulder length hair.
Step 1: Gather the hair into a Ponytail
To get started, move your hair away from your face and neck and bring it into a high ponytail. You could leave a few strands falling to the face or neck to give your face a little frame. Depending on how messy you would want your bun to look, you could decide to tie the ponytail loosely, skipping the brush and allowing it to have a few bumps which ultimately add to the relaxed look.
Step 2: Twist It
This is basically the most important part of the whole process. Once you have your hair in a high ponytail position, twist the strands until they are taut, then wrap the long twist around the base of the ponytail to form a high bun. This could take a few seconds or longer, depending on how long your mane is. Also, feel free to make the bun wrap as tight or loose as possible and comfortable.
Step 3: Spice It Up
Finally, you can spice up your bun and keep it in shape by using an elastic band or a scarf around it or by simply using bobby pins to hold up start hairs around the sides. You may also decide to use a hair elastic band matching your outfit, a fun scrunchie, or even a flirty bow.
2. The Chignon Updo
A chignon updo is a classic choice for both casual, formal, or professional events; it can never disappoint. This relatively simple and easy-to-do updo, allows you to twist your hair into a classier version of the bun with loose strands and running loops for added intricacy. Below are simple steps on how to get this updo done.
Steps To Getting The Chignon Updo Done
Step 1: Make a Ponytail
The first step is to make the hair into an updo by getting the hair away from your face and neck and holding it up at the top of your head to form a ponytail.
Step 2: Form a Loop And Secure With Bobby Pins
The second step would be to form a loop. The chignon is basically a loose knot rather than a twisted, wrapped style so the loop can be achieved by grabbing the ponytail and twisting it well enough so that the ends are pointed towards the crown. Your loop should have more volume than a bun, having achieved the desired volume, the loop should be secured at the base of the neck with a few bobby pins.
Step 3: Wrap The Ends
At this end, you will have to wrap those ends that are still loose, and to do this, you will have to split the ends into two equal parts and wrap one end up and over the exposed elastic, then use your bobby pins to pin them in place; then use another bobby pin or two to secure the ends of your hair on the other side.
Ensure you tuck in any stray strands to achieve a neat formal finish. Bearing in mind that this is not a shower or a sock bun the final result should be a vertical loop at the bottom, with a ribbon of hair (your ends) swiped across the top of the loop and secured on either side.
3. Twists and a Bun
We all know that a bun can be quite basic but if you love it regardless and would love to rock it any day any time, you can actually spice it up in an updo by dragging a few twists across the sides of the head to give the hair more texture and a superb dimension. Twists are easier to pull off and require less concentration and time, unlike braids. If you would love to give this a trial, below are the steps to follow:
Step By Step Guideline To Make Twists and a Bun
Step 1: Make a Side Ponytail
To get started, make a very deep side parting, then pack the hair into a side ponytail just behind the ear. After this has been achieved, using a fine-tooth comb, backcomb every strand of hair from the ponytail to pad it out.
Step 2: Make Small Sections Of Hair
To achieve this, simply twist a section of hair tightly and spray with a shine spray. Once the section has been tightly twisted, allow the hair to gather up and grip the ends into position at the base of the ponytail. Repeat this technique on all the remaining lengths and build up gradually into a bun shape.
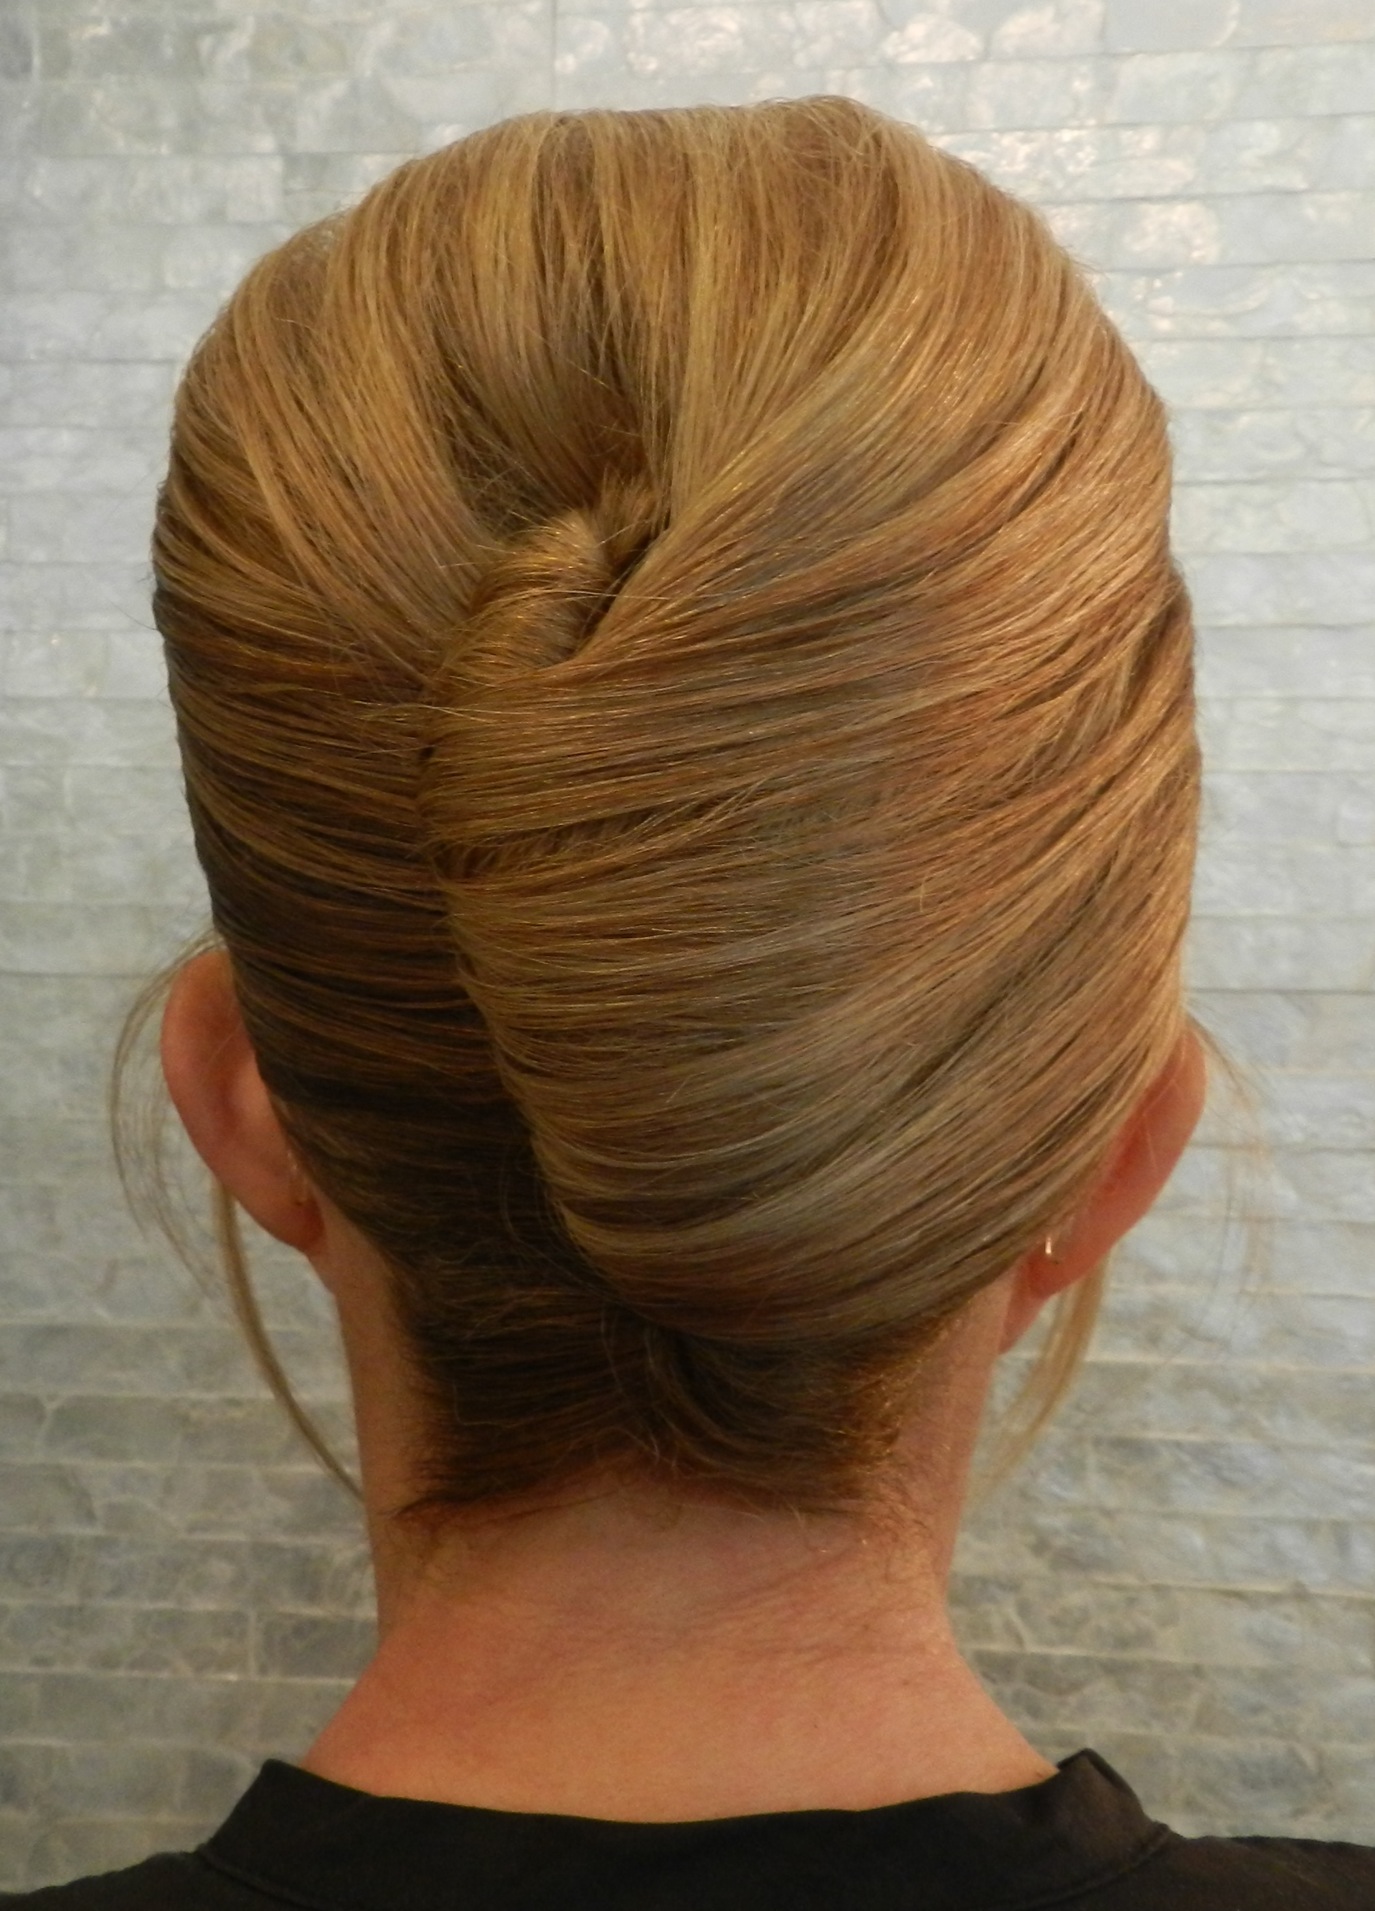
4. The French Roll
One of the quickest and most chic updos for long hair is the French roll. It is classy, easy to pull off, and will perfectly fit mermaid silhouette gowns or sleek monochromatic minidresses. If you are planning to rock this hairdo to a formal event, it is not just perfect but it will also add some sort of maturity to your appearance.
Guideline For Making The French Roll
Step 1: With a fine-toothed comb, separate a section of hair from your crown to your bang and brush it forward. Then gently pull at the crown and back session with the same comb to create volume. Bear in mind that the more you pull at the crown and the back session of the hair the more volume your French roll will have! Spray it with a bit of hairspray for extra shine.
Step 2: At this point, smoothen your hair back using a comb or the tips of your fingers to get rid of any knots or tangles. Note that the sleek look is part of what makes the French roll unique. After smoothing the hair to ensure there are no knots and tangles, apply texturizing and hair spray before you start pinning.
Step 3: Gather the smoothened hair to one side as if you are attempting to make a low ponytail, then pin that section of hair. This requires lots of pins so don’t be afraid to use them. You can also spritz with a bit of hairspray to achieve a firm hold.
Step 4: If your hair is very long, you can keep it in place with an elastic band at the lower end. Then roll the hair upwards with the help of the bobby pins. Make them extra twisty then wrap around your fingers a few times and pull out. The decision to either pin your twist at the top or middle of your hair is entirely yours. Whichever one you choose, be sure to secure them with more pins.
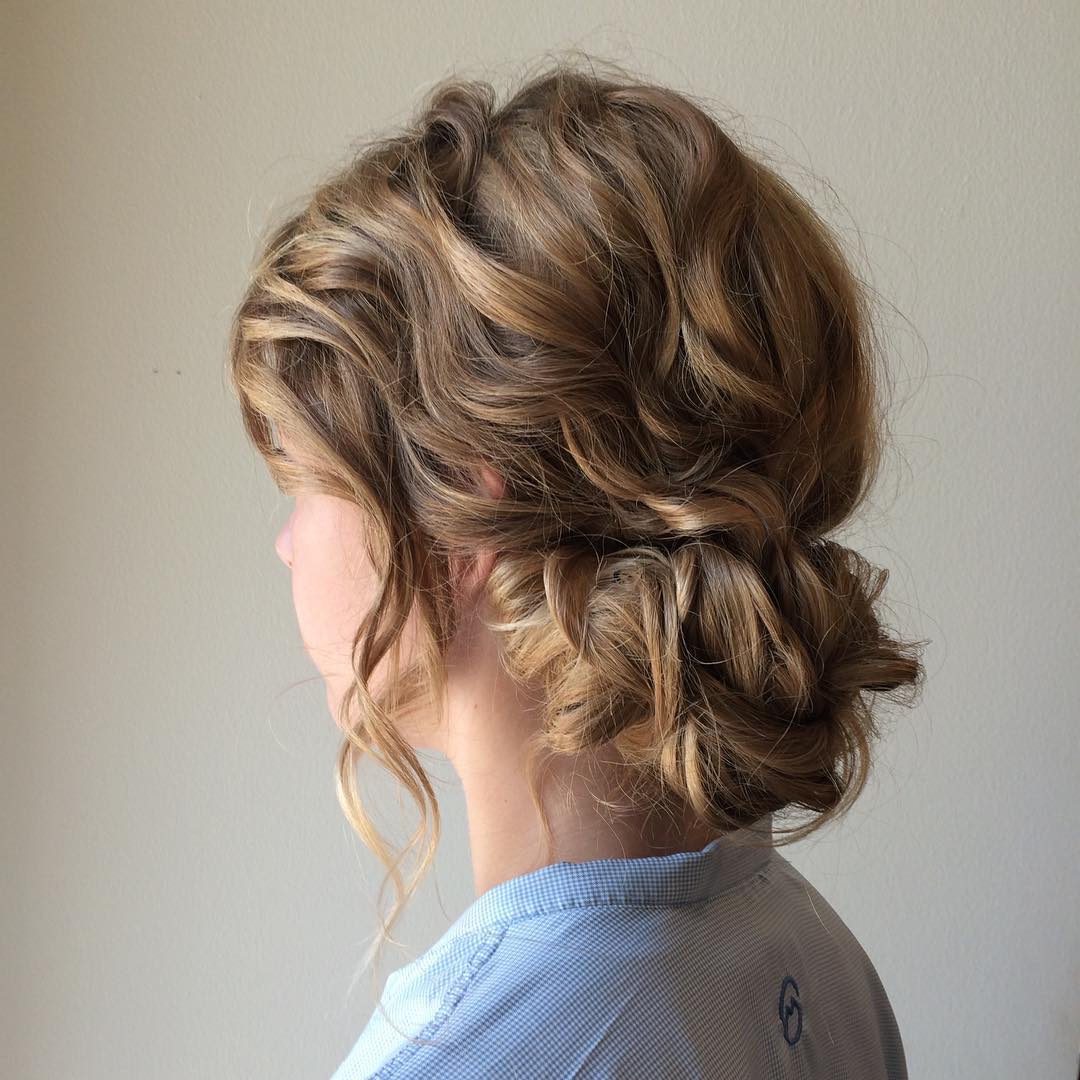
5. Curly Medium Updo
You could decide to spice up your updo by giving it wavy and springy curls to create that unique and feminine look. The medium updo is relatively simple to pull off, although it may look bland sometimes. To counter this, you can use some jeweled hair accessories to keep things interesting.
To Make Curly Medium Updo:
Step 1: The first step to achieving this style is to divide the hair into a top half and a bottom half. Then roll the lower half upwards.
Step 2: Then divide the top half into three sections, a big center section and two other side sections. After you have done this, twist each side section of the hair and pin it tightly under the bun you had created earlier. You can also pin it up underneath the hair, falling over the bun if you prefer this.
Step 3: Roll the remaining center session of the hair loosely and pin it up so that the curly ends of your hair are seen. Then pin it up over the bun and finish off with a few spritzes of hairspray.
Half Updos For Long Hair
Half updos are ways to spice up your hairstyle, and it is perfect for either everyday wear or special occasions, they are great for all hair types and length. Take a look at these suggestions if you desire to try them out.
6. Boho Half Up, Half Down Updo
One beautiful thing about half updos is that they come in handy on days that you are looking for something simple to rock without breaking the bank and yet look classy. Rocking Boho half updos on such days, will just be perfect.
Steps To Making Boho Half Up, Half Down Updo
Step 1: Start by applying texture spray or medium hold hair spray to the hair. After you have done that, sweep the hair back into a half-up section, starting above the ears, secure the half up into a ponytail with an elastic band.
Step 2: Wrap a small section of hair from the ponytail around the elastic and secure from behind with pins.
Step 3: Braid a small section from the remaining hair, then secure at the end with an elastic. Touch up the curls a little, if needed, and finish with a medium-hold spray.
7. Twisted Fishtail
With a fishtail braid twist turned into a bohemian summer style, this half updo style gives your face a unique frame and it is perfect for getting you through all those weddings and even an evening outing.
How To Style Twisted Fishtail
Step 1: Part the hair on the same side of the head that you would love your twist to fall; thus.
Step 2: Take two sections of the hair above each ear and twist them backward, then secure the twisted sections with an elastic band.
Step 3: Make a fishtail braid with the ends of those sections, then cut out the elastic, and what you have is your half updo.
8. Topsy Tail
Here comes another updo that gives you the ability to create an array of flip, wrap, twist, tie or even twirl with so much ease. It’s a classic hairdo that is still very much relevant and in vogue.
Step by Step Guideline On HowTo Create Topsy Tail
Step 1: Gather your hair into a ponytail and secure it with an elastic band.
Step 2: To create the Pony Topsy Tail, do a low ponytail. For the Half Up Topsy Tail, part half your hair into a high pony, and for the side Topsy Tail, gather the top side section of your hair.
Step 3: After the above steps have been achieved, place the Topsy Tail, (loop side up) through the ponytail, behind the elastic band, and thread the ponytail through the loop, then pull the Topsy Tail firmly down through the hair, making sure your hair is firmly in place.
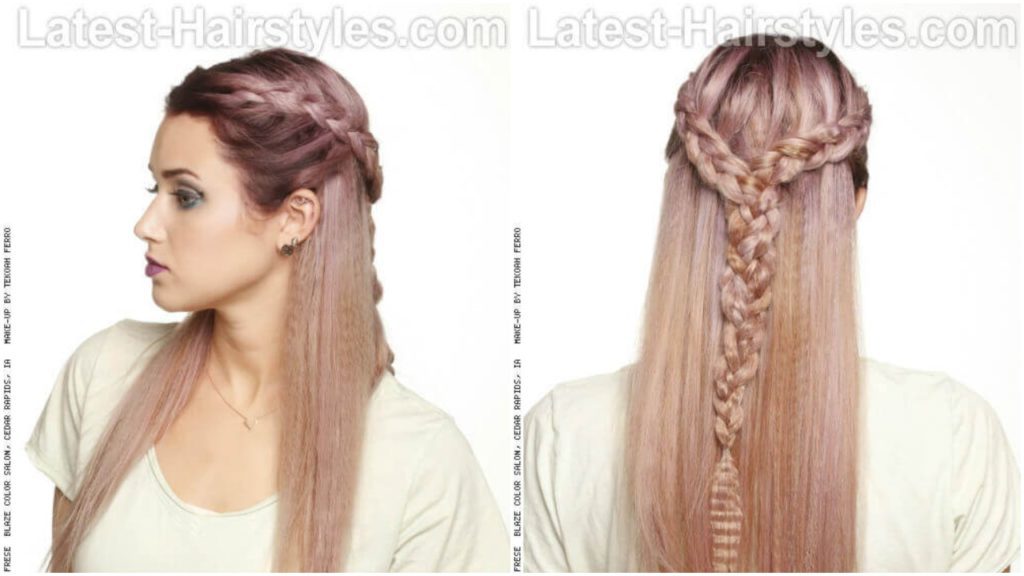
9. Double Braided Half Up, Half Down
This half updo is a masterpiece and is ideal for everyone with long hair that is thick-textured, an oval-shaped face will just be a perfect complement.
How To Style:
Step 1: Part your hair as desired and smooth it out with a brush.
Step 2: Having achieved a smooth texture, create a french braid on both sides of the hair then combine the braids to meet then further braid them together
Step 3: Secure the ends with a band; you can also decide to crimp a few sections of the hair that are not in the half-up section. Sprinkle the whole hair with a light holding spray and voila!
10. Mirco Crimped Tucked Braid Updo
It all depends on the texture of your hair, crimped hair can be achieved with braids and no heat. To achieve this, you should try sleeping with your hair weaved either in full or half, depending on the style you intend to try.
This half-up is a bit edgy and involves both crimping and braiding but you will come out looking stunning.
How To Style Mirco Crimped Tucked Braid Updo
Step 1: Get started by making small ridges around the hair using a crimper.
Step 2: Create a French fishtail braid with a loose tension allowing for some wispy strand
Step 3: Tuck the braid under or create a very simple bun and voila, you have your micro crimped tucked braid updo
Prom Updos For Long Hair
Prom is something every high school girl looks forward to and part of what makes the occasion spectacular is the hairdo that is worn alongside the beautiful dress, gorgeous shoes, and accessories. Got other things ready but not sure of the hairstyle to complement your outfit? Here are some suggestions of updos that will suit the occasion, especially if you have long hair.
11. Side French Braid Bun
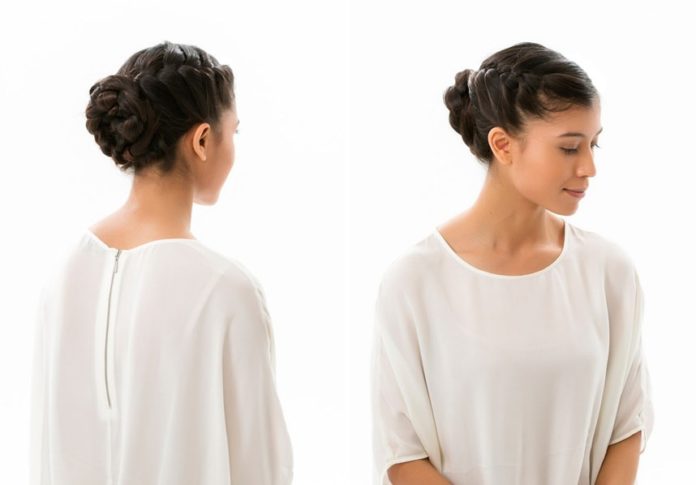
You can try this stylish updo and come out looking stunning. Despite the intricate appearance, this updo comprises a combination of stylish braids and thick loops that look very complex and sophisticated but this isn’t as complicated as it looks; it is very easy to pull off.
Before getting started with this style, make sure to wash, dry, and detangle your hair.
How To Style Side French Braid Bun
Step 1: Start off by parting the hair on the side you prefer, then take a section of the hair in the front right and separate it into three equal parts.
Step 2: Start braiding the hair diagonally towards the back of your head. This gives the braid a nice curve and instead of having it go straight back completely, it goes along the right side of the head, when this happens, grab the sections of hair for the french braid from either side and continue braiding until you reach the back middle of your head.
Step 3: Smooth the hair from the left side of the head, creating a nice clean braid. After doing this, start a normal three-strand braid and start twisting and braiding the hair, creating a bun.
Step 4: The last step would be to gather the end of the hair together and secure it around the braided bun with bobby pins. Secure where you see fit and ensure that no loose hair is sticking out. Once you are certain the bun is sturdy enough and won’t fall; spray some aerosol hairspray, smooth with a styling comb, and viola!
12. Upside Down French Braid Bun

Here is another amazing updo that could be tried out for a prom night or a date. It is easy to put up, although you may be needing some extra hands.
Steps On How To Style Upside Down French Braid Bun
Step 1: Comb through the hair making sure there are no tangles, then bend the head over for all the hair to fall forward.
Step 2: Section the hair into three separate parts and start braiding (french braid). Braid the hair straight towards the top of your head. How high you want the bun to be will be determined by where you stop your braid. So, if you want to achieve what you see in the above picture, continue braiding until you reach the top of your head.
Step 3: Once you are done braiding, tie the remaining hair with a band and twist the tip into a bun, secure a with bobby pins and you are good to fly. You may also decide to tuck in a fresh flower for extra gorgeousness.
13. Rope Braid Updo
This style is so amazing and quite simple and easy to achieve, all you will be needing to get the magic done is just a few clips and some products to emphasize the hair strands and make hair shine.

Steps On How To Style Rope Braid Updo
Step 1: Part and separate the hair into four different sections: two side sections and two back sections.
14. Interwoven 3 Strand Braid
This is one of the simplest and time-saving updos for people with long hair that you can style your hair into for prom or that dinner date.

How To Style Interwoven 3 Strand Braid
Step I: Divide hair into 3 sections, then french braid the center section to the bottom of the neckline, and hold with a hair clip to prevent it from falling. Repeat the same steps with the remaining two sections.
Step 2: Once the three sections have all been braided, remove all 3 clips and braid the 3 sections into one full braid.
Step 3: Secure the final braid with a hairband and you are ready to step out in style. Use hairspray to hold in place and prevent falling strands and also add shine to your hair.
15. French Braided Ponytail
This braided pony is perfect for just about any occasion: a prom event, dinner date, office, or even a weekend hangout. It is simple and easy to make.

How To Style French Braided Ponytail
Step 1: You will begin by separating a section of the hair from the forehead down to the crown. Then comb the hair towards the back to create a volume and divide it into three sections to make the French braid.
Step 2: Continue braiding until it reaches ear length then bring the rest of the hair into a ponytail and secure it with a hairband.
Step 3: Smoothen any flyaways with hair spray then take a little hair from the ponytail and wrap it around the hairband to keep it hidden. Secure it with a bobby pin tucked into the ponytail and you are good to go.
16. Medium Pin-Up Updo
This is another simple easy way to put up an updo you could try for your prom or any other important event you may be attending soon.
How To Style Medium Pin-Up Updo
Step 1: The first step to achieving this style is to smoothen the hair a little bit with a comb then divide it into a top half and a bottom half. Roll the lower half upwards.
Step 2: Divide the top half into three sections, a big center section and two other side sections. After you have done this, twist each side section of the hair and pin it tightly under the bun you had created earlier. You can also pin it up underneath the hair falling over the bun if you prefer this.
Step 3: Roll the remaining center session of the hair loosely and pin it up so that the curly ends of your hair are seen. Then pin it up over the bun and finish off with a few spritzes of hairspray.
To avoid the severity of a full pin-up updo, try a lower version to give it an amazing casual appeal. Just like messy buns, this style is better-worn loose. You could also drape a few wavy bangs down the temples to soften the look.
17. Side Bun Updo
This simple updo can give your outfit the elegant twist it needs for that special prom night. Featuring lots of loose textures and messy curls, you can use bobby pins to give it some volume and height then finish it off with a glamorous jeweled crown if you so desire. Note that this comes out better with unwashed hair than with freshly washed one.
 How To Style Side Bun Updo:

Step 1: Detangle your unwashed dry hair. You could apply mousse, gel, or an anti-frizz serum if your hair requires it; this is just to help create that smooth texture.
Step 2: Comb the hair on the side where you want your bun then with the comb, create a part in the hair. You can use a little hairspray to help hold the part in place, then move the hair that pops up onto the appropriate side.
Step 3: Comb the hair smoothly to the back of your hair and tie it with a hairband. Bunch up the combed hair by the side and secure with bobby pins.
Step 4: Bring down a few wisps hanging down your ears and finish it off with a glamorous jeweled crown (these are optional though) and voila.
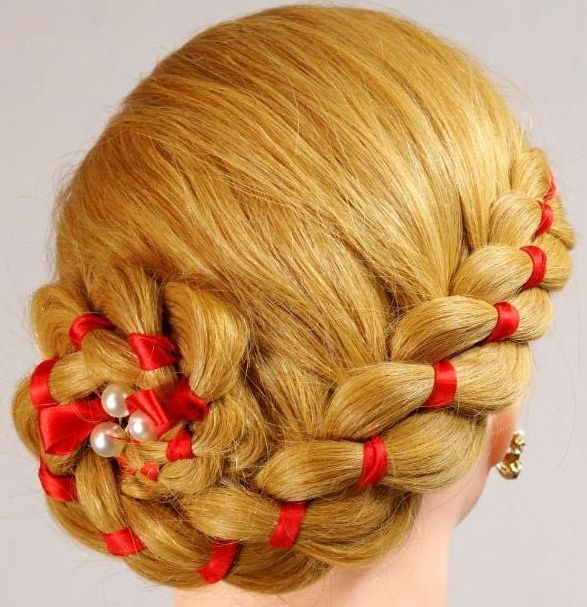
18. Ribbon Braid Updo
This is one of the classiest updos ever and of course, it is not the regular easy-to-do hair updo but with little patience and skill, you can have it done for your prom or special occasion.
It comes with an intricate ribbon braid that runs asymmetrically on one side of the head and ends in a pretty decorative bouquet bun. Flowery hair accessories give it a more classy and fascinating touch, making it perfect for almost any special occasion.
 How To Style Ribbon Braid Updo:
Step 1: Prepare the hair to give texture and hold; you could achieve this by using a spray. Start braiding the hair from either side of the ear. The braid shouldn’t be tight. The unique thing about this style is that you can use your desired braiding technique.
Step 2: You could complete the braid at either the temples or braid it around like a crown. then tuck the end between the hair and secure with bobby pins.
Step 3: At this stage, you will take about 1/2 inch of ribbon (your preferred ribbon) and folded it in half, hook a bobby pin on it, and anchor it in the hair by weaving in the bobby pin into the hair such that it is hidden. Ensure that the ribbon is also loosely weaved to make the hair fuller.
Step 4: Make sure that the ribbon is symmetrically weaved. Once weaved to the end, tuck the ribbon and pin it to the hair, then use a spray to lock in your look!
19. Braided Crown Updo
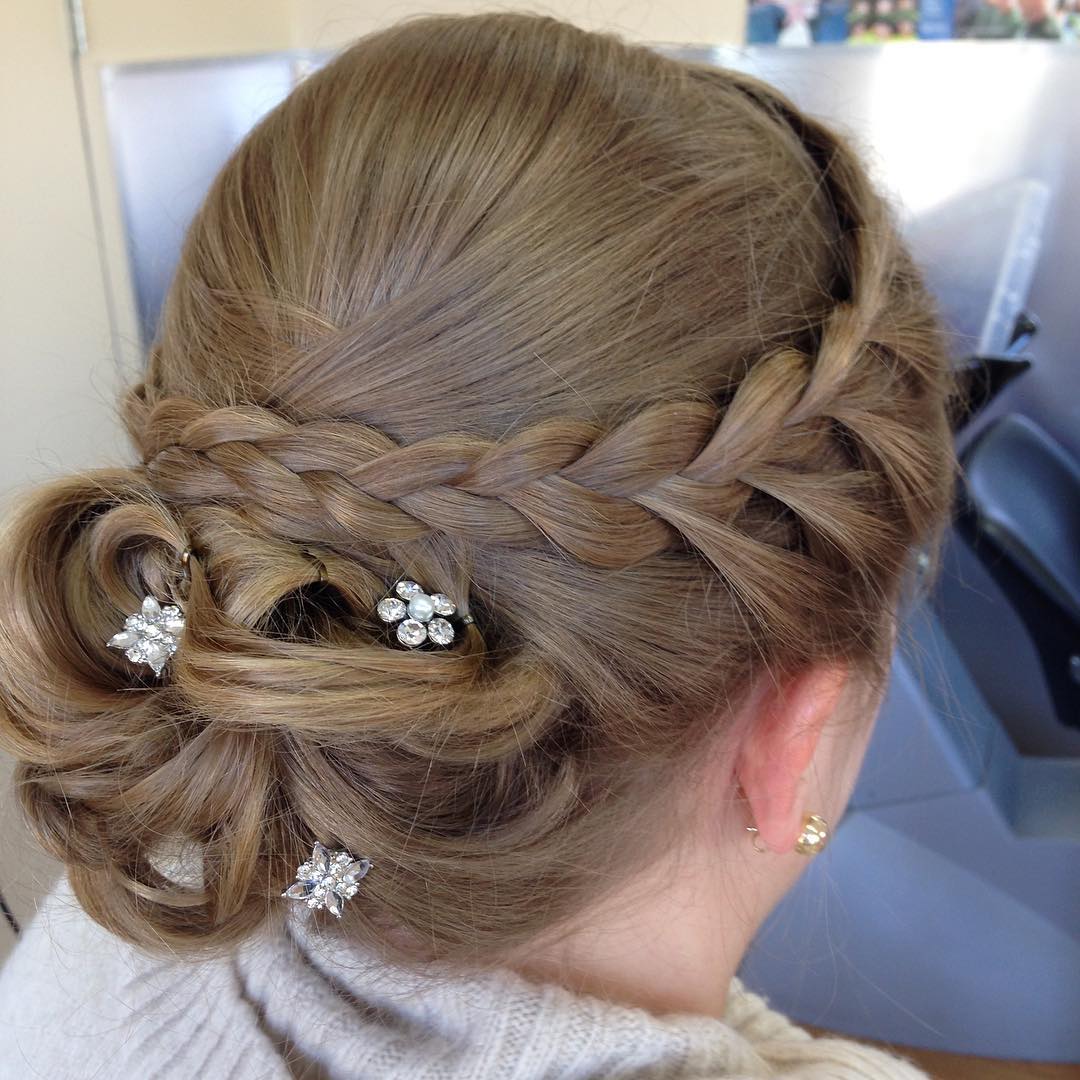
If you want to wear more than just an updo, this is just the perfect style for you; a simple French braid that runs around the head, creating a stylish crown, with a looped bun and flowery accents that will not just make you appear glamorous but also look elegant.
How To Style Braided Crown Updo:
Step 1: part out two sections of the hair, precisely the sides just above the ear. Make the rest of the hair into a ponytail and hold it with a hairband.
Step 2: Wrap the ponytail around itself to create a low bun at the base of your head, then start making the two side sessions into braids until you reach the end of the section. Secure the ends of the braids with hair elastic bands.
Step 3: Wrap the braids around the bun, secure with U-pins, and with bobby pins, tuck the flyaways in and finish with hairspray to make the hair stay. Then add your desired hair accessories.
20. Intricate French Roll Updo
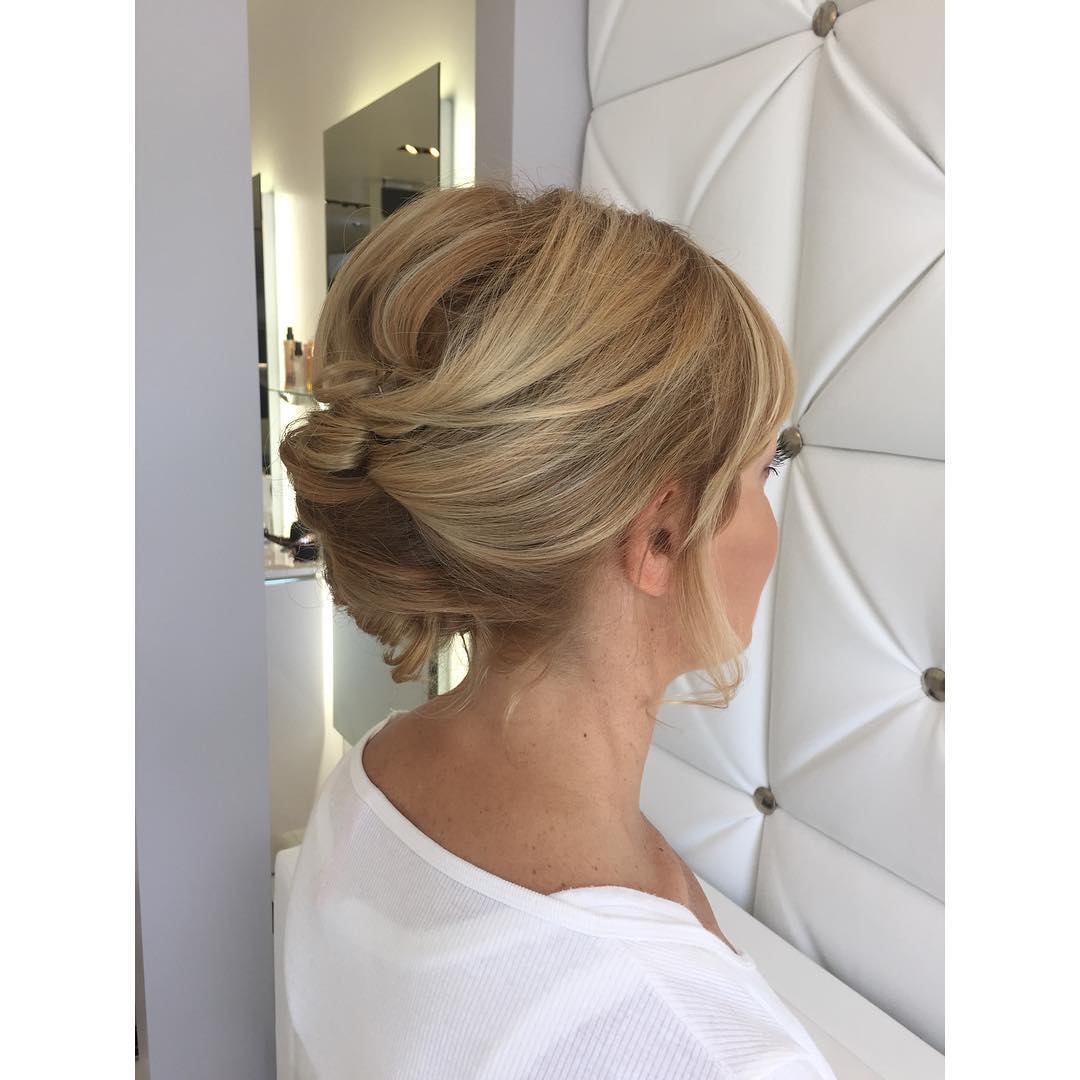
This is similar to the french roll above and if you have the time (and the skill), you may want to give it a try. This looser roll is a more classy one as it uses bobby pins to hold separate sections of hair. Once again, you can let a few strands down to give your face a more delicate frame.
How To Style Intricate French Roll Updo:
Step 1: Separate a section of hair from your crown to your back and brush it forward. Then gently pull at the crown and back session with the same comb to create volume. Bear in mind that the more you pull at the crown and the back session of the hair the more volume your French roll will have! Spray it with a bit of hairspray for extra shine.
Step 2: At this point, smooth all your hair back using a comb or the tips of your fingers to get rid of any knots or tangles. Note that the sleek look is part of what makes the French roll unique. After smoothing the hair out to ensure there are no knots and tangles, apply texturizing and hair spray to the hair before you even start pinning.
Step 3: Gather the smoothed hair to one side as if you are attempting to make a low ponytail, then pin that section of hair. This requires lots of pins so don’t be afraid to use them. You can also spritz with a bit of hairspray to achieve a firm hold.
Step 4: If your hair is very long, you can keep it in place with an elastic band at the lower end. Then roll the hair upwards with the help of the bobby pins. Ensure to make them extra twisty then wrap around your fingers a few times and pull out. The decision to either pin your twist at the top or middle of your hair is entirely yours. Whichever one you choose, be sure to secure them with more pins.
Casual Updos For Long Hair
Many people have come to believe that updos are for very serious occasions and must be perfect but having gone through some of the simplest, easy to style, and messy updos above, it can be seen that updos can also be casual and less formal. Below are a few other updos for long hair that can be worn to less formal occasions and events.
21. Simple Bun Updo
This is very simple and can be worn for less serious occasions and still be noticed. Just because it is simple does not mean it has to be boring. You can spice it up with hair accessories if you feel it’s too calm or something.
How To Style Simple Bun Updo:
Step 1: To get started, bring the hair to a ponytail. You could leave a few strands falling to the face or neck to give your face a little frame. Depending on how messy you would want your bun, you could decide to tie the ponytail loosely, skipping the brush and allowing it to have a few bumps which ultimately add to the overall calm look.
Step 2: Once the hair is in a ponytail position, twist the strands until they are taut, then wrap the long twist around the base of the ponytail to form a bun and add the beads to it.
22. Jeweled Low Bun Updo
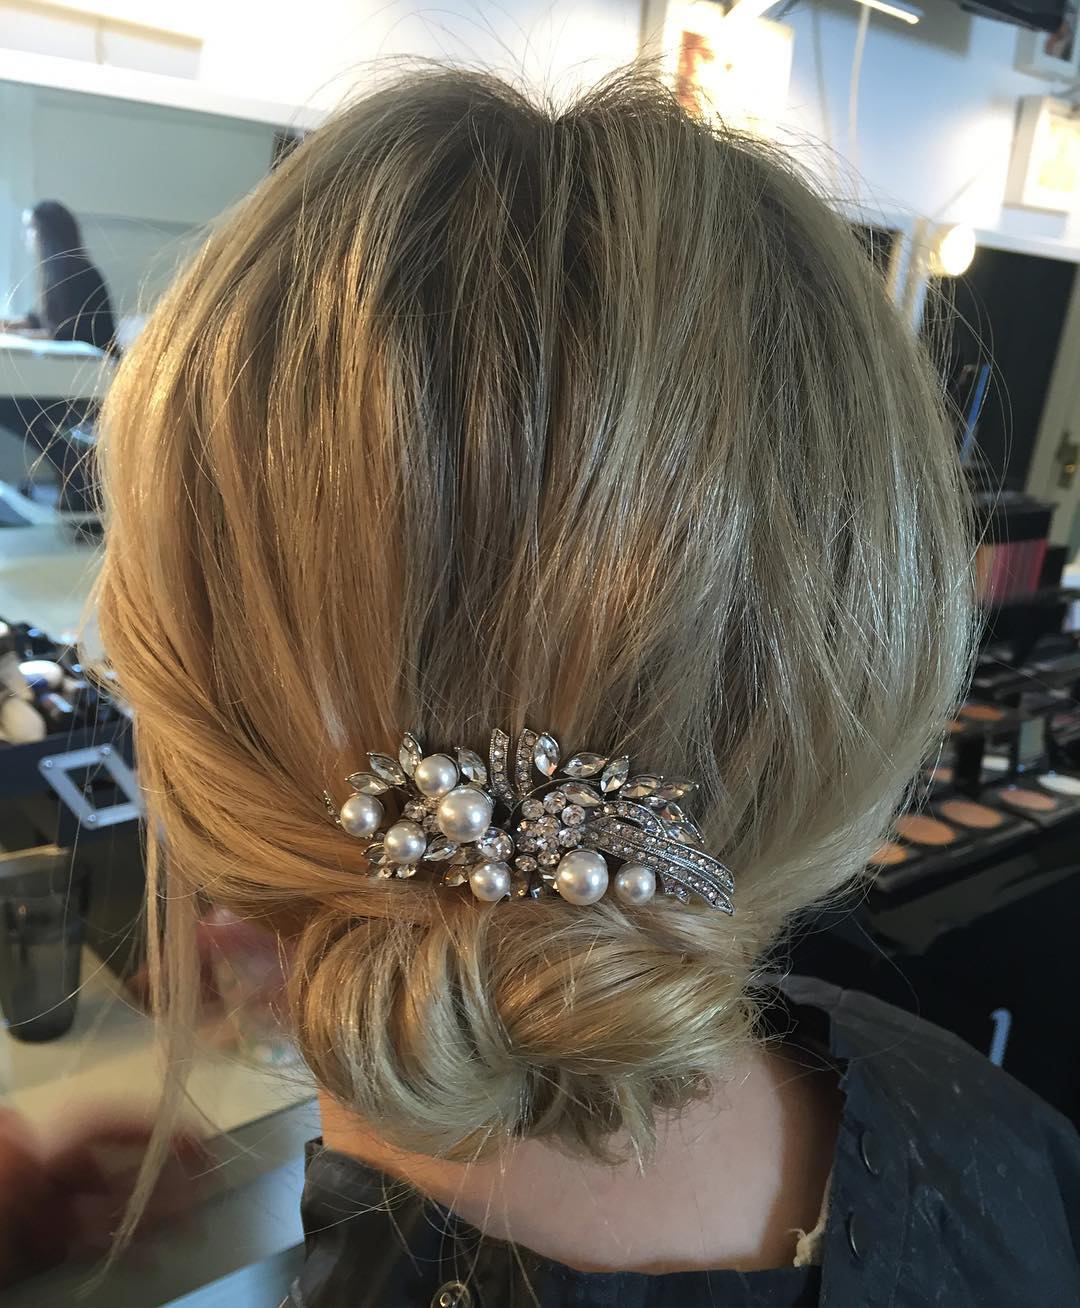
Although ultimately, it may look a tad too simple, a low bun is an effortless and very classy look that you can quickly style your long hair into. Spice things up by including some glamorous jewels and throwing in some loops to make the bun exciting.
How To Style Jeweled Low Bun Updo:
Step 1: To get started, bring the hair to a very low ponytail and then make it into a donut,
Step 2: Once the hair is in a donut position, hold it firm with a hairband or elastic band. Then decorate with beads or any hair jewelry of your choice.
23. Criss-Cross Twist Updo
Don’t get scared off by the name, styling this updo isn’t as hard as the name may sound, it is pretty easy to make, all you may be needing is a large quantity of bobby pins.
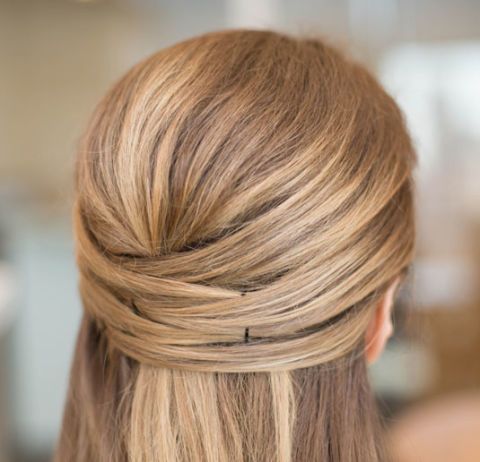
Guidelines On How To Style Criss-Cross Twist Updo:
Step 1: You will want to start off with the twist on the half pony and to achieve it, just grab a section of hair from the front and secure it down with bobby pins.
Step 2: Grab another tiny section of hair from the front right side of the head, wrap it behind, and secure it with a bobby pin on the left backside of the head. Repeat this process on the left and on the right. Continue with the process until you’ve pulled back three to four sections on each side, alternating the placement of the pins every time, and that is it, you have your criss-cross twist updo ready.
24. Second-day Boho Braid
Here is another simple hairdo that can be worn every day and on less formal occasions. It is said to be called second-day braid because it looks better on the second day after you make it and if you have greasy long hair, this is just a perfect hairdo for you. It is also simple to style.
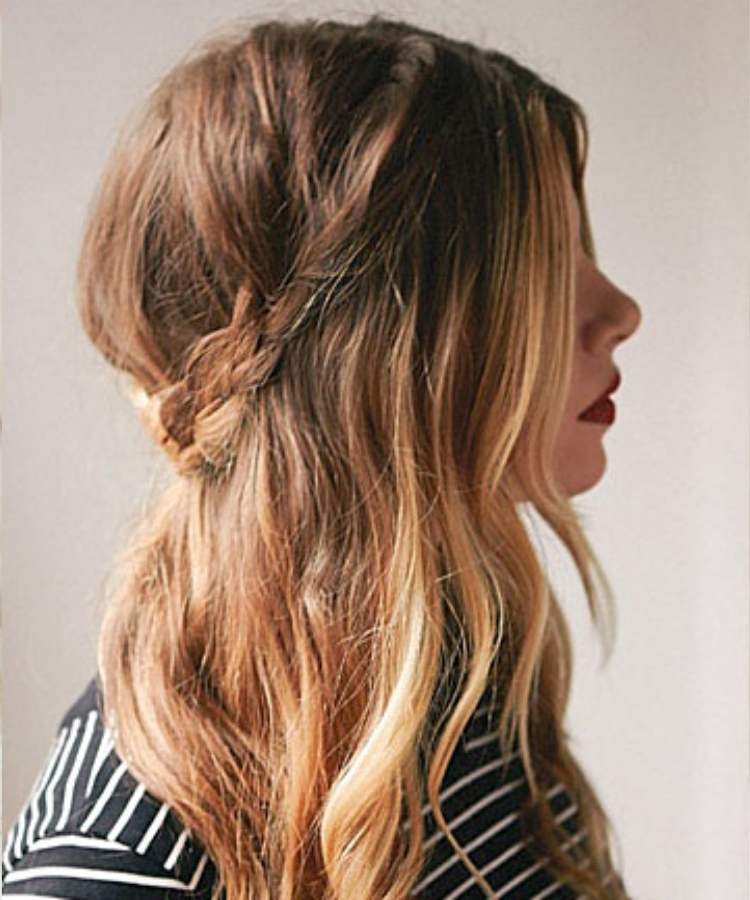
How To Style Second-day Boho Braid:
Step 1: Start off by throwing some waves into your hair with a curling iron.
Step 2: Loosely braid 1-inch sections of your hair on either side of your head, to give it that boho-vibe, and secure the braid at the nape of your neck with bobby pins, and voila! you are ready to hit the streets.
25. Top Wrapped Bun
This wrapped bun will not just complement your casual outfit making you look simply gorgeous but it is also simple to put up at almost no cost.
How To Style Top Wrapped Bun:
This is so simple to style. All you need to do is simply pull the strands to almost the top of the head, pin them into a fully wrapped bun and you are ready to fly.
Quick Updos For Long Hair
To say it as it is; some people would have loved to wear updos everyday if they knew quick ones to try rather than styles that will keep them longer in front of the mirror. We have shared quite a number of simple and easy-to-style updos above, below are some more that can be achieved in the shortest possible time.
26. Bow Updo
This is basically one of the easiest updos you can come across and it’s no less classy in any way because it is easy to install and this is one of its many advantages.
How To Style Bow Updo:
Basically, all you need is to do here is to gather the hair into a low ponytail, then split the ponytail, loop its sections, and cover the elastic band. Swipe the picture above to see the video tutorial.
27. Sleek Chignon Updo
Chignon updos are classy, simply beautiful, and can never go out of style. If you are a lover of Chignon updos but a bit concerned about styling, you need not worry, this quick and easy-to-make sleek Chignon would do the magic as you would be done with it in only a couple of minutes.
How To Style Sleek Chignon Updo:
Follow the steps in the picture below to style;
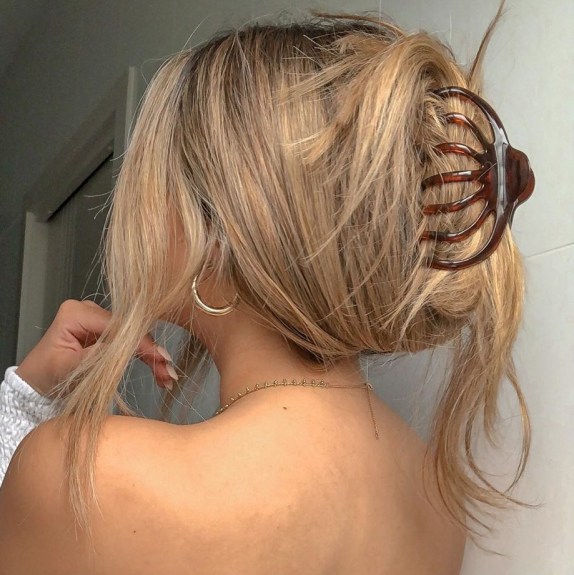
28. Lazy French Knot
Sometimes less is so much more. Keep it simple with this lazy French knot; easy to put up and you are on your way out in just a few seconds.
How To Style Lazy French Knot:
Styling this isn’t hard at all, all you have to do is to first gather all the hair into a pony position, then twist and secure with a big hair clip and that’s all. You can also pin it if your hair is not so full.
29. Bubble Ponytail
You will simply love this easy-to-style bubble ponytail if you are looking for something pretty quick.
How To Style Bubble Ponytail:
For guidelines on how to get this hairstyle done, swipe the picture above for a video tutorial.
30. Messy Pony
If you have long thin hair and looking for something quick to take you through the day, you may want to try out this easy messy pony, it will show off your facial frame, as well as give you the comfort you seek.
How To Style Messy Pony:
Just gather the hair into a pony position, hold it with an elastic band then bring out some hair and wrap around the band to hide it. bring out some hair to fall or hang over your face and that is it.
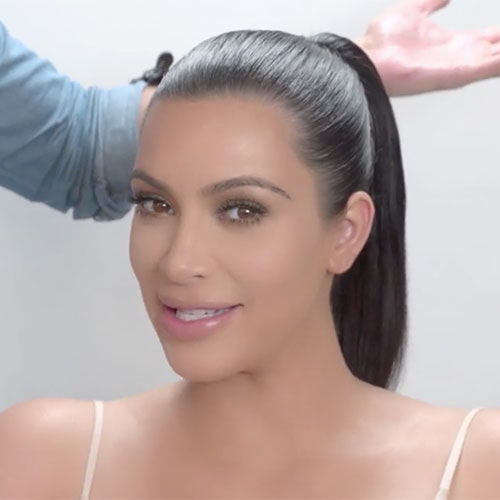
31. Slicked Back Ponytail
And what about a slicked-back pony? Just like the two ponies listed in this category, this simple and easy-to-style hairstyle will equally give you the ease and comfort you so crave for.
How To Style Slicked Back Ponytail:
This style is as easy as brushing your hair so well that it’s super smooth. Then gather it into a pony and tie it with a hairband or an elastic and you are good to go. This video tutorial can also be of help.